Hello everyone!Lots of people want to create their own free websites easy and free.I made this post to help you all!Let’s star with what you need to do,the basics and etc. 1.How To Create A Website
To create a website you just need to make an account an account at WordPress! WordPress is a free and easy blog creator and I highly recommend it!Just head over to the WordPress homepage,here:http://www.wordpress.com
There you can create an account and if you want you have the option to make a blog with the account.After registering you need to check your e-mail Inbox that your registered the account to and check for an ”Approving Message”.When your account is created,the next time you sign in WordPress,you will be signed in your account and will be taken to your Dashboard.In your ”Dashboard” page you can edit everything about your blog!On the left side you will see a line of clickable options,such as ”Dashboard”,”Posts”,”Media”,”Pages”,”Appearance” and lots more.They can be used to edit certain parts of your blog.

2.Making A Post or New Page
To view your blog you just need to click on the sign saying your blog’s name(Ex:Name’s Blog) It is located next to the sign saying ”Dashboard”,on the right side.You will see you have a sample post made by WordPress to show you how to start.You can delete it or just leave it as a sample.You will also get a sample of a comment from ”Mr.Wordpress”.You have both options-delete them or leave them.To make your own posts like these go to your Dashboard,click on Posts on the left side of your screen under ”Store” and select ”Add New”.You will be taken to a field from where you can select a title for your post,add text and other stuff.At the post you can edit the fonts your writing with to Bold,Italic and Strikethrough.Here is how they look:
Bold Italic Strikethrough
You can mix them look like Bold and Italic: Bold and Italic Mix Sample , Italic and Strikethrough Mix Sample ,Bold and Strikethrough Mix Sample
There are lots others.You can also make things in ”Unordered List”:
- Unordered List Sample Test
- Unordered List Sample Test 2
And you can make things in ”Ordered List”:
- Ordered List Sample Test
- Ordered List Sample Test 2
You can make them like ”Blockquote”:
”This is a Blockquote Sample Test”
”This is a Blockquote Sample Test 2”
”This is a Blockquote Sample Test 3”
You can make text pop up on the left at the post:
Test
You can make text pop up on the align center of the post:
Test
You can make text pop up o the right at the post:
Test
You can insert link with one of the buttons.Example:
Click
here. Don’t worry-it will open in a new tab!
You can turn on ”Proofhead Writing” and view the post in ”Fullscreen”.
You also have the option for the ”Kitchen Sink” that includes some extra cool features.If you want to make a page you just go to Dashboard,and select ”Pages” on the left side of the screen.You click on ”Add New” and put a title and write in it.
NOTE:If you want pages to pop up under the header,so users can click on and visit them,you will need to get a Template/Theme that allows them.If not,they will just be displayed on your sidebar if you put the right Widget.
3.Put a New Theme And Widgets On Your Sidebar
To put a new theme you need to go to your Dashboard again,click on ”Appearance” under ”Ratings” on the left side of the screen.You can choose any kind-without a header or with,without a blogroll or with,different way of things popping up or different designes.You can always preview it before activating it!But unfortunately,not ALL of the themes are available for everyone-some are payed.Payed are only ”Premium” and they are better,but there are lots of free ones of which you can choose from!After adding a theme with a header and sidebar you can start decorating them by going to ”Dashboard”,then to ”Appearance” again.Select Widgets under ”Themes”.Widgets are HTML or text codes that you can add-on your blogroll which is either on the left or right side of your blog.For example they can show links to all your blog pages,sites you want people to visit or even a link to your Twitter,Facebook or a featured video from YouTube-Wordpress allows all of these options!You can add a Widget by dragging it from the free Widgets box you will see on the left side.There are Widgets you can add only once,like for example-a hits/views counter.Widgets like the ”Text”,”HTML”,”Image” and etc. can be added more than once since they can display different stuff of the type,rather than only one.If you want to make a Widget in where all of your blog pages are displayed and their links you have to drag ”Links” from the free widget box to the other free box on the right that doesn’t have any widgets.I prefer adding widgets like ”Calendar”,”Blog Archieves” and ”Hits Counter” because they are the most often used and needed.Have fun customizing your blogroll with widgets.I will help you by giving you some HTML codes to display at first.
Newest Stuff Happening on Club Penguin(Big Version)SWF
Newest Stuff Happening on Club Penguin(Small Version)
Join Club Penguin Banner(Big Version)
Club Penguin Jetpack Adventure Widget(Big Version)
4.Create a Simple Banner/Header
To create a simple banner you will need to take a basic picture of your penguin.I prefer you use one of these 2 ways to make a banner.
1.Take a snapshot of your penguin’s profile picture with no background,by pressing ”Print Screen” on your keyboard,the button is located on the left of ”Scroll Lock” and above ”Insert”.”Insert” is above ”Delete”-hope this helped you all.After that open the graphics editing program ”Paint NET”.It is a free professional editing graphics program.You can download it at:
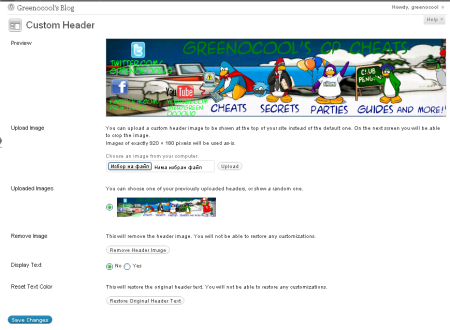
Just insert snapshot and click ”Keep Canvas Size”.Then select only the part of your player card on the background and hold down ”Ctrl+Shift+X” to ”Crop Section”.You will now have to use the ”Magic Wand” tool-it displays a magic wand and can be found by searching through the ”Tools”.Click on the blue around the penguin and click ”Delete” on your keyboard.Then the background will get blue and grey around him.Just use the ”Select” tool to cut him and paste him in the background you want,by opening a new ”Layer”.After that you can use the ”Text” tool and type in what you want it to say.Make sure to check what are the exact dimensions for the Header,go to ”Appearance” and then ”Header”-you can view information about the header without even having one.The first number means the ”Width” and the 2nd-the ”Height”.Resize the image you made before uploading the Header.
2.Do the same(instructions above at #1),but just snapshot your penguin waving.
5.Check Site Stats
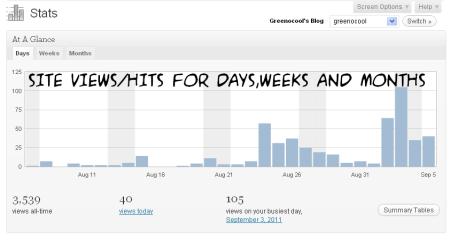
To check your full site stats you have to go to ”Dashboard” and select ”Site Stats”.The other new quick way for some stuff is to go to ”Blog” on the black bar at the very top of the screen on WordPress and select ”Dashboard”,”Site Stats”,”Add New Post” and etc. Anyways-at the ”Site Stats” page you can check how many viewers you have for every day,week or month.You can check what you got the views on-what page,certain post or anything.You can also see your active site subscribers and lots more!
6.Checking Comments And Editing Them
When you get a new comment on your site you will notice because when you go to your Dashboard,you will see a new comment popping up in your ”Comments” section.If you are the owner you have the power to approve it,disapprove it,delete it,spam it and reply to it.Comments can be posted even if you are not registered on WordPress and be just a guest.Comments will always appear after moderation-you can change these settings at ”Comments” in ”Dashboard”.
7.Creating Polls and Adding Them On Your Blog
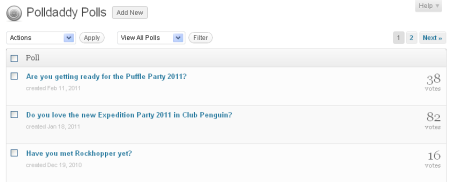
To create a poll from WordPress you need a PollDaddy account which can be created in seconds.Just go to your Dashboard and click no Polls.You will then be taken to the poll creator-choose the question,answers and answer limit,add the design of the poll and view some other cool options.Once your poll is done.Go to ”List Polls”.When you find the poll there,click on ”Share” and copy the WordPress/PollDaddy code for it.Paste it on a ”Text” widget on Sidebar at ”Widgets” or just paste it in a blog post.
8.Adding Other Blogs and Users to Your Site
Now I will show you how to add more people to your blog so they can actually see some stuff in it and even edit them.To add someone to your blog is a powerful option that at first can be done only by the Real and Main Owner.Head to ”Users” in your Dashboard and add other blogs to yours-you have to know their e-mail actually.You can make them Owners,Administrators and etc. You have to be careful of what they do thought.They will have the opportunity to view your stats,post from your site,moderate comments and even edit some stuff like your header,posts and design!You have to pick carefully and have full trust over people you invite.When they accept you will now have the option to see everything in their blog,too-but you will have the same options as they have on your blog.If you want to unadd them you have to visit ”Users” again on your Dashboard.
9.Custom Designs and Extras
The ”Custom Design” can be found in your Dashboard at ”Appearance”,below ”Header”.This is some new stuff WordPress added somewhere through the time.They are stuff like special new more customizable fonts test and Custom CSS!You should definitely check it out.Wordpress is also available on iPhone,through your mobile phone,through iPad and more!Visit the ”iPad” page,too.And in extras you can find extras about certain stuff in your blog.They change from time to time-example:when November starts there is a special option that appears on ”Extras” in which it could ”snow” in your blog and you can see the snow falling.This is an exclusive only available every November-January option.
10.Settings on Your Blog and Media
Head over to your Dashboard and select ”Settings” from the menu on the left side of the screen.In this section/page you can add some extras too to your blog and edit more stuff about your header and etc.For example you can change your blog’s title,your tagline,e-mail address,timezone,date format,time format,language and lots more including a main picture of your blog that people will recognize it with.This is basically a powerful page,too.
And finally we come to the last basic feature-media.In the ”Media” tab you can check all of the pictures/images that have ever been uploaded to your blog from the beginning untill now.From there you can delete them,check them out,restore them and even change their format.This is a cool page,too and it is a good place to save lots of image files you can’t usually keep on your PC.
Hope I helped you with the basics-creating the website and learning the basics of it.Comment below if you have any questions,problems or stuff you aren’t sure about.;D
Explore posts in the same categories: Cheats
This entry was posted on September 5, 2011 at 5:24 pm and is filed under Cheats. You can subscribe via RSS 2.0 feed to this post's comments. You can comment below, or link to this permanent URL from your own site.


September 5, 2011 at 8:55 pm
Wow! That post explained it right down to the dot!
September 6, 2011 at 6:36 am
Thanks,Cometear!By the way,can I post on your website cheats,too.:D
September 6, 2011 at 6:43 am
Cool,this helped me alot with some stuff,thanks!;)
September 6, 2011 at 6:44 am
Cool,I should tell people about this-it might really help them.
September 9, 2011 at 3:30 pm
hey green its David42305 so how do you get that picture when u open a tab u can see a tiny picture so how do u get that??
September 9, 2011 at 5:10 pm
That is easy-just go to ”Settings” on your Dashboard and on the right you will see a tab where you can upload a picture from your computer.Upload a file and click ”Upload”,save it and then visit your blog.It will appear at the left side of the tab next to the title.Note:it might take some time for it to appear,expect it within 1-2 hours,remember that.;) Hope I helped,ask more questions if you need help.;D
~Green~
September 13, 2011 at 10:13 am
Good report in addition to simple to help understand explanation. How do When i try obtaining permission to help publish part on the article around my approaching e-newsletter? Giving correct credit ratings to your account this article author in addition to hyperlink towards webpage would not become a dilemma.
September 15, 2011 at 8:09 am
details a realistic look at the issue. Thanks, i really like finding thoughts that tell more of the story, they are more beneficial anyway.Women Prefer Thicker Penis to Longer
September 16, 2011 at 6:07 pm
If you’d like larger [i]nail fungus can’t make use of lamisil[/i] secure with the health care provider.
September 16, 2011 at 9:36 pm
Information good post with your web site, it genuinely gives me a look on this theme.
September 20, 2011 at 3:34 pm
Hey there i would like to provide a quick manages and allow you to recognize a number of the illustrations or photos are not repowering the right way. I not really know the reason but I believe that it is a new associating issue. We’ve tried it into two distinct web browsers together with both equally show the identical consequence.
September 23, 2011 at 1:33 pm
hey umm but i use webs.com 😦 its different i think D:
October 3, 2011 at 1:47 am
maybe it’s me but it seems like the page layout is a bit weird. it might be my laptop though. anyway